SailNet Community banner
  • SailNet is a forum community dedicated to Sailing enthusiasts. Come join the discussion about sailing, modifications, classifieds, troubleshooting, repairs, reviews, maintenance, and more!
1 - 14 of 14 Posts

lans0012

· Daysailor wannabe cruiser
Joined
·
142 Posts
Reaction score
20
Discussion starter · #1 ·
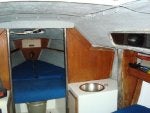
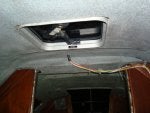
I just bought a Ranger 22(like a Capri 22). The interior had very ugly nasty stinky mildew brewing carpet on the hull sides and as headliner. I yanked all that crap out and now I'm scratching my head. Underneath this carpet is some orangeish messy adheasive stuck onto fiberglass. The surface of the glass is rough and shows the sloppy job they did finishing the hull. This could be the work of a wannabe boat builder too as it looks like they had no clue what they were doing. Different layers of fiberglass can be seen overlapping with the end of the cloth fibers raised up about 1/8th inch. I have good cushions for the boat and I was thinking I'd just paint over this and be done with it. I don't want to spend a bunch of money on this, or time. I was thinking about sanding off this adhesive and smoothing out some of the rough spots with a thickened epoxy(which I have only read about and seen at west marine). Then painting with a mold mildew resistant paint.

First question:

Is this a good idea?

The interior is very tight and confined. I'm worried about sanding dust and vapors. I figured I'd open up all hatches and use a fan to ventilate the cabin. How should I do this safely? I have a P100 respirator that says it's good for vapors. Does this block dust too? What type of respirator should I use for sanding and applying and sanding epoxy with fillers? Are some fillers safer than others? (don't want to die of lung cancer before I sail around the world)


Can I use bondo to smooth this out before painting?

Safety is the primary concern. Cost second. Completely smooth beautifull interior way down on the list. Just want to brighten it up and be able to keep it clean.

Should I just apply more adhesive and put carpet up and be done with it? Live in St. Petersburg, fl and it is humid down here and especially in the cabin. How can I prevent mold/mildew from attacking my new carpet?
 
How can I prevent mold/mildew from attacking my new carpet?
A solar vent would go a long way in helping with the cause of the mold/mildew.

I sailed a capri 22 last year, fun boat. If the ranger is anything like it, your in for a great time.
 
my opinion

put a box fan over the forward hatch, suction works better to get the dust out. yes a 100 rated mask will stop dust but it wont last as long, it will clog up.

i would don a suit with mask get a sanding wheel, put the fan on and grind away. after you knock down the real rough spots, i would then try solvent to remove the old glue. if the solvent does not do it go back to grinding. after you have made the surface smoother and glue free do a quick grind over everything to get some tooth for what ever you do next.

options are try to put on some filled epoxy like a plaster job, another layer of carpet. you might want to try wallpaper if you get it smooth enough with the grinding. personally i might think about finding a mobile truck bedliner company to see if they have white bedliner and maybe spray it. if not then maybe a texture spray gun that could handle thickened tinted epoxy ( or just gelcoat ) and just spray a layer to cover the grind marks.
 
3M makes an adhesive remover that works pretty well.

After smoothing the surface as best I could, I used a roller to apply two coats of an exterior deck & trim paint -- designed to fill little cracks and holes. It looks good, is easy to touch up, and doesn't stink (after it dries).

A solar vent or vented hatches will help a lot.

The areas above the setees and around the windows are all unfinished fiberglass. If you get up close you can see the roughness but from a distance it looks pretty good. Visitors tell me it looks like vinyl headliner until I point out to them that it's just paint.
 

Attachments

Interior liner

Ian

Our last boat also came with carpet glued to the hull. It was ugly, was falling off and had glue under it. I replaced with hull liner material from Stright MacKay. It is mildew resistant and designed and manufactured for this purpose. Stright-MacKay

You can see pics of before and after at this location.
Full Tilt 2 pics

This hull liner over bare glass tidied up the look considerably and also made the boat more comfortable. Cost for the material was $59 plus the price of the glue. I used carpet adhesive.

Mike
Image
 
What you really want for doing work in this kind of situation is a full face respirator mask, like this one:

Image


Vapor cartridges won't block dust, you need a P95 or P100 cartridge.

I would highly recommend lightly sanding the interior surface with a 100 grit random orbital sander to smooth out the interior surface. Fair it if you want an even surface, but that isn't really necessary IMHO. Then "paint" the interior with Interprotect 2000E, which makes an excellent primer for fiberglass in general. The IP2000E will protect the laminate from moisture intrusion and will stick far better than any paint would.

If you're really ambitious, you might consider glassing in some furring strips and putting some insulation and paneling up on the overhead and ceilings of the boat. (btw, the ceilings of a boat are the vertical surfaces-or walls...the "ceiling" of a boat is called an overhead)
 
A steel wire cup brush rated for at least 14,00 RPM in a right angle grinder will knock the foam and glue off the fiberglass. It'll knock a lot of the uneven surface down if you get real enthusiastic about it. Not a fun job anyway you do it.
 
I did extensive fiberglass work on the interior of a Catalina 22, and repaired a dleaminated hull on a Hunter 27. A fan is good for keepng you cool, but a joke for handling fiberglass dust. Buy yourself a small shop vac and use the filter bags, not the filter cartridge, they sell for them. Set the vacuum on deck and lay the open hose end right where you are sanding. This will collect a lot of the dust. You can then keep vacuuming up as you work. The bag then gets tossed in the dumpster and the inside of the vacuum is still clean. You'll find that the shop vac is the best investment you can make for working on a boat interior. If you get one that vacuum up water you can even wash the interior and get all the water out easily.

Don't make dust in the first place. High speed grinders make tons of dust. What I found that actually works very well is the little 2" round click lock sanding disks used on a 1/4" electric drill. You'l find that they cut quite fast, but the lower speed compared to a grinder doesn't generate the huge dust cloud. Also you'll find you can reach lots of places you'll never reach with an angle grinder. Use the really coarse ones to quickly remove the raised edges.

The fiberglass job you are seeing is typical of what you find in any fiberglass boat. It's rough because that is how fiberglass works. Fiberglass is efficient. You build up the hull, then add as many layers as needed to provide strength in areas that have high stress. It is typical to taper back the layers so that stress concentrations aren't formed where thick glass meets thin.

Don't paint the interior hull with expensive epoxy or marine paint. Use white exterior alkyd house paint! Get one that has a biocide in it to keep mildew at bay, houses have the same problem on the North side in many areas. Look in many boats and you'll see this same kind of paint used by the manufacturers.

Don't over do it, leave time for sailing!
 
I'm worried about sanding dust and vapors. I figured I'd open up all hatches and use a fan to ventilate the cabin. How should I do this safely? I have a P100 respirator that says it's good for vapors. Does this block dust too? What type of respirator should I use for sanding and applying and sanding epoxy with fillers? Are some fillers safer than others? (don't want to die of lung cancer before I sail around the world)

Can I use bondo to smooth this out before painting?
Last winter I did some interior glass repairs to our P303. The previous owner had a small galley fire that caused the cabin liner gelcoat to crackle. I used a Dewalt random orbital sander with shop vac attachment. The sander discs have holes in them where the dust is sucked through to the vac. It worked very well with only minimal dust in the cabin, all of which came up with a quick vac. As for filler, I used bondo as a fairing compound. It worked very well, was less expensive than epoxy, and sands easily. I would never use it on the exterior or for structural repairs, but for interior fairing it was a very good option. I then painted over the area with white Interlux Brightside primer. The interior repaint is scheduled for this coming winter (gotta use the boat while the weather cooperates). I know some people have reported using house paint with good results, however, given the relatively small amount of paint that I will use, I've decided to go with Brightside for the interior with a flattening agent. It should hold up better in the long run, and given that all I'll probably need is a quart, money wasn't as much of a concern. Best of luck. Let us know how the project works out and don't forget to post pictures.
 
Discussion starter · #12 ·
3M Bondo Glass and Mildew Resistant paint

Ok so I uploaded some pictures so that some of you could see what I'm doing. First off I'll tell you that I've never worked with this stuff before but my boat neighbor used mildew resistant paint in his boat and it looked great.

I used Bond Glass which is a polyester resin mixed with 1 inch or so strands of glass to fill in some of the big gaps that I saw. It was hot in the cabin and it kicked faster than I thouhgt. I might have used too much hardener but I'm not sure. Anyhow it worked just as it did in my imagination last night except I didn't get to mess with in for long enough. I just did a small section about 2x2 feet to get an idea of what I was working with. I cleaned off as much adhesive as I could and sanded with 80 grit by hand. I cleaned the surface with Acetone and mixed the bondo glass and faired out some of the roughest spots. Then I waited about a half hour drank a beer and then sanded some of my mistakes down a little and then painted with some mildew paint I bought at home depot I forget the name but I think it is the only brand they carry.

Anyhow my test section looked rough but a lot better than if I would have not used the resin filler. I'm sure I'll get a little handier with the stuff so as long as this stuff works like it did in the test area it'll look good enough for me. Even my girlfriend said it was ok much to my suprise.

So far it looks like I'll be able to clean up and brighten the interior for under $100.

I'll post pictures again to let you all see if it works out or not.

Thanks for all your advice!!!

Mike
 

Attachments

Discussion starter · #14 ·
Finished...kind of.

Thank you all who responded on this link earlier. I have finished the interior and it looks great. I used a permacolor stone touch paint and then followed it up with the permacolor clear coat. I bought it at Walmart for about 7 spray cans at $7/can. I layed it on super thick and it hides the roughness and looks really good in my opinion. I would recommend it for anyone who has to paint a rough surface and doesn't want to spend a whole lot of time sanding and prepping. I sanded with 80 to knock most of the crud off and then wiped clean with acetone. Some spots had so much crap(old adheasive, rough edges...etc) so I just sprayed over it and it looks fine. On the berths under the cockpit I used a mildew resistant paint you can buy at home depot for $12/quart. It was plenty to paint those areas. I took the cushion covers to the laundry and washed them with bleach and took the foam to the driveway and hosed them down and sprayed bleach all over them. I let them dry out for a couple of days and put them back in the boat.

Then I bought a new nissan 6hp 25" that is awesome. The boat sails great and looks good enough now. Got about $3500 in the boat now. Check out the pictures
 

Attachments

1 - 14 of 14 Posts