SailNet Community banner
  • SailNet is a forum community dedicated to Sailing enthusiasts. Come join the discussion about sailing, modifications, classifieds, troubleshooting, repairs, reviews, maintenance, and more!

Topsides touch up - my gosh so complicated

5K views 25 replies 9 participants last post by  matthewwhill  
#1 ·
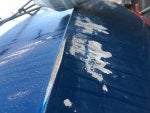
My fender has rubbed away a small patch of my blue topsides (which is gelcoat that someone had painted over we believe).

There is a small area of exposed fiber glass. I still have the can of blue paint. I would like to paint this exposed patch. Just sand and paint, right? Not according to all the websites I’ve visited. There are multiple possible and variable (depending on the source) steps with cleaning, solvents, fairing compounds, sanding with a variable rotation electric sander, undercoat, more sanding, and then finally putting the blue paint on. And it all has to be done in warm temperatures which ain’t happening here for a while. My boat is currently hauled out getting bottom paint courtesy of the boatyard.

My question is : does it really need to be this complicated or can I just keep it simple and protect the fiberglass and make the boat look nicer by sanding by hand and dabbing on the paint? It doesn’t need to be perfect and I don’t t need to see my reflection in the hull.

Thanks
 
#2 ·
For starters, this highly depends on the type of paint on your hull. Single part vs two part. What brand and type are you using?

Short answer is the single part paints are more flexible. Two part paints are nearly impossible for the novice. Depending on your standards, fresh paint can look poor against older UV faded paint.

Truthfully, the extent of the damage you describe, usually qualifies to repaint the boat. You can do it yourself, with single part paint and a technique called rolling and tipping. First, let us know what you've got.

p.s. buy fleece fender covers, if you don't already have them. Mandatory for painted topside.
 
#3 ·
You can (obviously) do whatever you want.

All those instructions are about making a good looking, long lasting repair. If you skimp on any of those steps your repair will not look as nice and/or not last as long before it needs redone.

The thing is, nobody is really documenting the required steps to get a good-enough looking repair that will reliably last a year or two. As a result, it's difficult to know exactly what steps contribute in what degrees. It's possible that if you skimp on too many steps you'll have a repair that will be flaking off in only a month or two. "good enough" is very subjective, so it's difficult to describe exactly what steps are necessary to get a level of "good enough" that's acceptable.

If you're pressed for time and just want to protect the damage until you can make time to fix it correctly, I would suggest (at the minimum) cleaning the surface meticulously with appropriate solvent, a few coats of primer and a few coats of topcoat. I would take steps to ensure the area being fixed stays at the recommended temperature+humidity for the curing period. However, I won't guarantee that for any length of time, and I doubt anyone else would either.

To my understanding, one issue is that exposed glass fibers can allow water to wick behind the paint and cause the paint to fail prematurely, which is why all the sanding and fairing is important (as well as for appearance). Also, glass fibers are the worst kind of splinters, so you don't want them exposed anywhere you might physically touch.
 
#5 ·
Thanks. I believe this is so. There is a layer of paint (pealing in places) and a deeper layer of what we believe to be blue pigmented gel coat. The patch that my original post described is slightly yellow/brown and to my eye looks like exposed fiberglass. It's about 2 inches by 8 inches right on the point where a fender was rubbing.

Some background: its a great old 1975 boat I got from Craigslist for $3000 and I got all new standing and running rigging, new tiller, new mainsail, I installed new tracks for the jib cars etc... So I have been maintaining it to an extent. I actually love it, it's been a really good day sailor that could over-night and eventually I would like to upgrade when my kids are off to college, I have more time etc...

I'm just trying to think rationally about how much money and time to put into it knowing that it's not my ultimate boat and because I could easily spend the cost of replacing it with a comparable Craigslist special in better shape.

For argument's sake, what would be the downside of doing nothing and letting the fiberglass be exposed? Would it be reasonable to just touch it up every year or two?

Thanks again everyone!
 
#6 ·
Some of the "extreme" recommendations you may be seeing include painting hull portions that are below the waterline. These need a good barrier coat to them to ensure water doesn't slowly wick into the fiberglass layers as polyester is not 100% waterproof iirc.

Paint is paint. Generally speaking the "worst case" above the waterline is that the paint peels off or doesn't cosmetically look "appealing". It's easy to sand off and do again if you don't like it. Since it's relatively small you could give it a go and if you don't like it redo it differently next time. If you were painting the entire hull I would be damn sure i did it properly as I would never want to do it again.

Get a good exterior based primer made for plastics, follow it's instructions and ensure you have good coverage. Primers not only even out the base colour to ensure an even top coat show, but they are extra "sticky" to bind to the surface being painted and allow the top coat to bite in and not peel (when done correctly). Top coat (again following instructions on the paint) with an exterior grade paint and see if you like the result. If the hull wore down in the area the paint rubbed off but isn't a safety concern then give it a light sanding, clean with acetone, fairing compound it flat again (much like drywall work), then prime->paint.

Got any pics? That'll help everyone know the extent of this.
 
#7 · (Edited)
I have something similar on my boat.
I keep the dink alongside using 2 fenders and have a couple of spots worn down to a blue gelcoat.
I dont want to relocate fenders or the dink....works well for me.
I can paint repair and/but it will happen again...and again etc
Idea is to get a couple of sq ft of vinyl from a sign lettering shop...cut to safe size, round corners and apply. Hull chafe stickies...
Eons ago i had a vinyl plotter and i think that material will do the job

...edit...
Just remembered i have 1.5 rolls of 4 inch white shrink tape onboard
Lets see if this works, and for how long
 
#10 ·
If you sand the exposed fiberglass to make a smooth repair you will likely create a flat spot that will also be thinner and weaker in an area that appears to get exposed to some pretty high stress from a fender/dock. Best practice would be to maintain the fiberglass at its original thickness, fair out to contour with new gel putty/coat or fairing compound and then paint. If the fiberglass is worn/damaged best practice to maintain structure will be to grind down below the damage, feather it out with a random orbit machine, replace the damaged layers of mat/resin and apply new gel putty/coat or faring compound to ready it for paint.

Once the fiberglass is exposed its no longer just a cosmetic issue and the repair will depend on the extent of the damage along with how many years you wish to keep the boat from going into the landfill.

We get boats maintained by painting over or all too often just ignoring that type of fender/dock rash and frequently they come to us looking like some Navy used them for gunnery practice. Many times the worn spots start to punch through from the pressure on the fenders requiring a much more extensive repair. Business Guru John Maxwells "Law of the Price Tag" applies here stating that sooner or later its going to have to be paid and the longer you wait the more its going to cost.

The repair was not done when it was just a paint issue along with the easiest/cheapest to repair, it was still not done when the gel coat was getting scratched where it just needed some gel coat repair along with new paint and now the gel coat is gone and the structural fiberglass underneath is potentially damaged requiring a more extensive/expensive repair.

When the fiberglass is exposed its not just a cosmetic issue. How well you put the final finish on and buff it out after the hull is built back up to its original thickness is the cosmetic part. You may have inherited much of this from a previous owner who painted/doctored up a rashed boat so he could sell it however it is what it is.

At this point we also don't really know if on the inside of the hull at that location there are any stress cracks showing through from hitting/rubbing against the fender so hard for so long which would require a bit more extensive repair.

You can try to hide the damage and disguise it with paint or you can repair it which is a personal choice. Best long term choice will be to repair rather than just camouflage the damage. How to repair will depend on how far into the fiberglass hull the damage has penetrated and how thick the hull originally was in that location since if was already very thin it will be more prone to punch through if not built back up.

To answer empirically would require eyes, ears and hands on the boat to see and feel if that area of the hull is softer, has more deflection, sounds brittle, is out of contour, etc.
 
#15 · (Edited)
If you sand the exposed fiberglass to make a smooth repair you will likely create a flat spot that will also be thinner and weaker in an area that appears to get exposed to some pretty high stress from a fender/dock. Best practice would be to maintain the fiberglass at its original thickness, fair out to contour with new gel putty/coat or fairing compound and then paint. If the fiberglass is worn/damaged best practice to maintain structure will be to grind down below the damage, feather it out with a random orbit machine, replace the damaged layers of mat/resin and apply new gel putty/coat or faring compound to ready it for paint.

Once the fiberglass is exposed its no longer just a cosmetic issue and the repair will depend on the extent of the damage along with how many years you wish to keep the boat from going into the landfill.

We get boats maintained by painting over or all too often just ignoring that type of fender/dock rash and frequently they come to us looking like some Navy used them for gunnery practice. Many times the worn spots start to punch through from the pressure on the fenders requiring a much more extensive repair. Business Guru John Maxwells "Law of the Price Tag" applies here stating that sooner or later its going to have to be paid and the longer you wait the more its going to cost.

The repair was not done when it was just a paint issue along with the easiest/cheapest to repair, it was still not done when the gel coat was getting scratched where it just needed some gel coat repair along with new paint and now the gel coat is gone and the structural fiberglass underneath is potentially damaged requiring a more extensive/expensive repair.

When the fiberglass is exposed its not just a cosmetic issue. How well you put the final finish on and buff it out after the hull is built back up to its original thickness is the cosmetic part. You may have inherited much of this from a previous owner who painted/doctored up a rashed boat so he could sell it however it is what it is.

At this point we also don't really know if on the inside of the hull at that location there are any stress cracks showing through from hitting/rubbing against the fender so hard for so long which would require a bit more extensive repair.

You can try to hide the damage and disguise it with paint or you can repair it which is a personal choice. Best long term choice will be to repair rather than just camouflage the damage. How to repair will depend on how far into the fiberglass hull the damage has penetrated and how thick the hull originally was in that location since if was already very thin it will be more prone to punch through if not built back up.

To answer empirically would require eyes, ears and hands on the boat to see and feel if that area of the hull is softer, has more deflection, sounds brittle, is out of contour, etc.
Thanks for the thoughtful post. I don't think there is any structural damage or thinning of the fiberglass, and I don't see damaged layers of mat. It looks like a blue hull above the waterline with a small area of blue (paint +/- gelcoat) missing where the fender was squished between the dock and the hull. I will try to post a pic.
 
#11 ·
Would love to see a good pic of this damage. In any event, how is a coat of paint going to protect what gelcoat reportedly couldn't. Makes me wonder if that damage was from something the prior owner did and they just painted over it.

Seems the OP is not asking a question, rather just letting us know they're going to paint over it again. Captain's choice.
 
#12 ·
Easypoxy is a decent 1-part paint. I am guessing that if you do some decent prep, you can just paint the damaged area and get away with it. Will it be noticeable? Yes, but you may be able to live with it. And you can expect similar issues in the future. Part of the problem with an amateur paint job.
 
#13 · (Edited)
You'd be dismayed how many times a recently painted boat being sold looked something like this a short time before it was put up for sale and was just doctored up to look nice instead of actually repaired. I hope the OP has not ended up with one of these.

This is being sold a a very valuable, desirable and rare Boston Whaler that needs some easy repairs to restore the Indestructible Whaler to like new condition. Someone will likely doctor it with Bondo and paint having some auto body experience and sell it as restored even though the glass and foam core underneath it is rotten in many places. Yes it will look pretty when their done but it won't be a sound boat unless they go through and actually replace the missing structure on the bow/front rub rail, rotten portions of fiberglass found all over the hull, centerboard trunk, etc, etc.
Image

Image

Image


BTW: Whalers both power and sail models can have really poor quality fiberglass on them and do not hold up that well in the sun if not maintained rigorously. What you see here is the norm we see when a Whaler is donated. Many get put out and can't understand why we refuse them even as a donation if there is no trailer or other item that is worth saving on them.
 
#14 ·
Light sand, penetrating epoxy, then paint. If you want to go a step further fairing epoxy over the penetrating epoxy then sand to feather the edges and paint. Further step would be to sand the entire hull topside, penetrating epoxy and fair damaged areas then paint.

At $3,000 I assume you only want to spend a few hundred to make the boat look OK.

One quart penetrating epoxy will be less than $100
One quart of fairing epoxy also less than $100
The blue paint you already have.
 
#17 · (Edited)
Yes I am thinking its just a poor repair done by a prior owner that was doctored up with paint.

I would still want to assess the quality of the repairs that were done and remediate any that were found lacking. If the fiberglass that's exposed is truly flush with the gel coat because it was repaired by building it up with mat and resin before it was painted by the prior owner/seller then structural integrity was more likely maintained however too may who do a coverup instead of a repair just cheat and sand down the surrounding fiberglass and gel coat to trick the eye once its painted making the entire area weaker as the topsides on a 24 foot boat can be only a touch over 1/8" thick so you do not have that much available to sand down before it becomes too thin. The cheat is what we have come to expect because too many sellers are only interested in maximizing profits which isn't going to happen when repairs are done correctly plus they are pretty confident that they are going to get away with it especially on the smaller boats that are less likely to get surveyed.

Again hard to say without touching, feeling, etc the bare spot and surrounding area along with inspecting the backside of the repaired area even if you need an inspection camera to get in there to put eyes on it.

If the paint wore through exposing the fiberglass glass already in that spot then if the area behind the paint is not reinforced/sealed with a gel coat/putty, etc its likely just going to wear through the paint again and expose the fiberglass to UV and water damage. Some may be inclined after the repair is done and set to put some wear film/boat wrap where the fender tends to rub hard causing damage and just peal it off and replace it before it wears through.
 
#18 ·
We'll have to wait until the OP posts a picture. But I suspect he is saying "fiberglass" when he really should be saying "gelcoat". My gut is telling me that the fender rubbing wore away the relatively soft 1-part paint and exposed the gelcoat underneath (which is probably white). Until we get pics and more info, who knows.
 
#19 ·
According to the OP "The patch that my original post described is slightly yellow/brown" which doesn't sound like the gel coat on this boat which was described as another blue layer.

Yes good sized bright clear pictures of the 2" X 8" damaged area will help along with a line of sight showing the damaged area and the contour of the rest of the hull in the same shot.
 
#22 ·
"Paint is paint."
Ouch. The folks at Interlux and a couple of other places will put a contract out on you for saying that. They no longer make "paint", they make "coatings". Paint is something you put on wallboard in houses. (Honest, my ear is still tender from the words they used.)

Matthew-
If you have one can, that's probably what we'd still call paint, a one-part product. If the manufacturer is still doing business, it might pay to contact them and find out what you have. Odds are that a 1975 boat was white, and painted somewhere along the way, and all it takes is one busy night with a fender rubbing to rub through a paint job. (Seen it happen to a friend's boat, and he was not a happy camper.)
Trying to make a repair and "feather it in" to blend with an existing color, which may have changed from years of UV exposure, or old paint where pigments may have settled in the can, can be challenging. That's one reason you'll find many differing instructions. You *may* be able to just brush or tipple the new paint on and get a decent match. But then again, professionals would use a paint sprayer and "feather it in" to blend it to the hull. A lot depends on what level of perfection you are willing to settle on.
Regardless of how you choose to do the job (and following the manufacturer's advice for their product often really is best) the surface preparation is critical. Proper sanding and solvent cleaning, treating it like you were prepping for surgery, will ensure the best bond between the old and new paint. If you're not familiar with painting and you have high standards, it may just pay to hire a pro to blend it in. (There must be something on YouTube showing what's involved and how the results can vary.) I've seen pros that can just hit a patch two or three coats, walk away, and bang it is done invisibly. And, other alleged pros who can spend a half day on the same job and still not get the same results. Part of it is having the eye the touch, the practice.
But see what the manufacturer says about that particular product, if they're still around.
 
#23 ·
OK, I will attach a good picture. You can see the multiple layers of paint and the white (not blue as it turns out) gel coat. Above that on the hard chine's edge is a smooth, slightly indented patch where most of the white gel coat I believe has been rubbed away. I think that's fiberglass - but there's not mat or rough surface there.

In any case. Today I sanded. I covered that fiberglass patch and filled some deep gouges with west system epoxy mixed with a filler to make a mixture with a peanut butter consistency. Applied it with a putty knife. Tomorrow the plan is to sand the epoxy, spot prime all trouble areas, and then begin the final coat of barrier paint.

The picture is rotated - left is up. Couldn't figure out how to rotate prior to uploading - sorry.
 

Attachments

#24 ·
Good luck with the project. It's still a bit hard to tell from the pic, but the chine does look worn away. That will be tricky to fill and form back into its proper shape. The patch on the topsides look a bit like adhesion failure more than just rash.

You definitely need fender covers and possibly shaped fenders, or you'll be repainting routinely.
 
#25 ·
Hard to tell from a small 640X480 picture of a wet boat however that appears to be reinforced epoxy and not fairing compound in that area which the fender still ground down fairly substantially.

Fill with reinforced epoxy, shape and paint then change your fender arrangement so they don't wear through like that again.

Some adhesion failure too which drives home how critical surface preparation is. When you clean and prep an area of fiberglass or gelcoat for paint remember that if it sets more than a few hours its no longer ready for paint. You get a blush on unsealed surfaces in a few hours after preparing them for paint and it will need to be cleaned again with a nylon scouring pad along with acetone if you don't start painting right after the prep is done.

Many paints only have a 12 hour or shorter re-coat window to get a homogeneous chemical bond so if you can't get to the next coat before that window closes you may have to wait up to a month on some paints before you can scuff the area up and now get a physical bond. Its not a hit and run proposition once you start the final finish process.
 
#26 ·
That was a "BEFORE" picture. I have since sanded and applied the fairing epoxy mixture.

It is now clear that there are three main problems with the topsides:

1. The fenders rubbed away blue paint and white gel coat at the pressure points on the edge of the chine (another identical boat was hauled out yesterday and had this problem at the same places).
2. The hull had been painted multiple times in the past, probably with poor preparation, and there are areas of adhesion failure also near the fender rubbing areas.
3. There are several places where encounters with the dock and other things have left scratches and gouges.

I have come to learn that the best practice would be to haul out during a warmer time of year and do the entire topsides correctly (clean, sand, clean, prime/fairing, sand, clean, final coat). Unfortunately I won't have the time to do that during spring or summer. I needed a new bottom and needed to address some other things and now is when I could work on it. So we are focusing on the problem areas with the intent of protecting the integrity of the fiberglass and making it look a bit better. To be honest, cosmetics are low on my priority list. I'm a casual day sailor and gunkholer. Oh, and I plan on getting some fender covers.

I'll keep you updated. Thanks to everyone. I've learned a lot.