
Adjusting Your Rig, step by step.
Small introductory disclaimer (because you Americans love to sue people):
For the record it is my strong personal opinion and belief that any and all work performed in a boat's rig should be performed and done by appropriate professionals, (that know what they are doing, because I have seen too many "rig professionals" that don't have a clue of what they are doing), do it yourself only if you have at least 3 ounces of brain and if have been around boats long enough and know with a minimal amount what you are doing..If you don't, PLEASE DON'T TOUCH IT, IT's NOT FOR YOU.
If you damage your rigging, your boat and/or hurt yourself or others don't come here blame me..get a life, I wrote this for intelligent people only.
This I write bellow is to help you get by should you not find a rigger near you. IT IS FOR INFORMATION ONLY.
Now the post:
A few months ago, one of our most dear friends here at Sailnet was stranded with a mast down problem, in a location where proper rigging professionals were scarce and the knowledge about rigging of the existing "rig professionals" was par to the local baker, veterinary and dentist…(I think he mentioned they were the same guy)…
So, and since he asked, I wrote him a small letter (sorry for the spelling mistakes and grammar), where I tried to explain to him how to set his rig in a way that would allow him to continue his journey and even get by in the future.
Please note this is my own experience, and other people may have better procedures..like I say, I am not a professional, and do this based on my own experiences. So if you don't like it, write you own and post here. It will only enrich the site. Please keep disagreements to PM level only, and I will discuss with you, should you not like or agree with me. Thank you.
HOW TO ADJUST AND SET YOUR RIGGING:
First you need understand this:
We will do 3 basic adjustment types:
• Lateral Adjustment
• Longitudinal Adjustment
• Sailing (done later) Adjustmet
1) Lateral Adjustment.
(NOTE: this has to be done in a day with no wind with the boat perfectly horizontal, shift weight if you have to, to balance the boat).
a) Install the mast, and make sure the intermediate and lower shrouds are lose, but attached.
b) Make sure the stays and back stays are attached but not over tightened. At this point you want the mast as vertical as possible.
c) Remove the boom, or lower it so its not pulling on the mast, we will need the topping lift.
d) If the mast is keel stepped, remove the centering thru deck bushings at this stage.
e) Once the mast is up and vertical by eye observation, take the topping lift or the main halyard and measure the distance from the top of the mast to the boat's toe rail on port side. Repeat on starboard side, make sure the location of measure is symmetrical and at the same distance from the bow.
f) If the distances are not the same, tighten the side with the longest measurement.
g) Tighten the upper shrouds to a snug fit the same number of turns on each side, until the mast is perfectly centered.
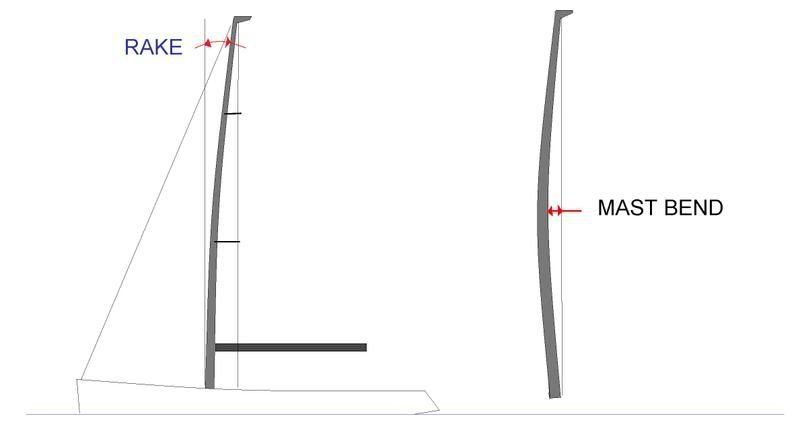
2) Longitudinal Adjustment. (Rake)
(NOTE: this has to be done in a day with no wind with the boat perfectly horizontal, shift weight if you have to balance the boat).
Rake will help increase or decrease Weather helm. Aft Rake increases weather helm, improving pointing, forward rake does the opposite.
Normal rake is 1 to 2º degrees aft for cruiser boats and up to 4º deg aft for high performance racers.
a) Install a bucket with water under the boom by the mast.
b) Attach a heavy object to the main sail halyard and dip it the bucket but it should not touch the bottom of the bucket. (The bucket and water are used to dampen the swinging of the halyard.)
c) Measure P, which is the distance from the boom to the top of the mast.
d) Measure the distance from the halyard to the edge of the mast, at the gooseneck.
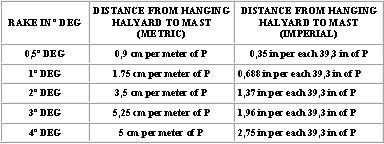
The distance should be as follows in the table:
![Image]()
Note, if you have a T shaped mast head, for halyard sheaves, add the distance of the T leg to mast to the above calculations.
Here is an example:
Our friend's mast is 42 feet long, or 12,8 meters, therefore for:
0,5º Deg rake = 11,52 cm = 4,33 Inches
1º Deg rake = 22,4 cm = 8,66 Inches
2º Deg rake = 44,8 cm = 17,3 Inches
3º Deg rake = 67,2 cm = 26,3 Inches
He also had a mizzen mast, and in his case, the mizzen mast has 21 feet, or 6,4 meters, therefore, for:
0,5º Deg rake = 5,76 cm = 1,96 Inches
1º Deg rake = 11,2 cm = 4,33 Inches
2º Deg rake = 22,4 cm = 8,66 Inches
3º Deg rake = 33,6 cm = 12,99Inches
e) Measure the distance from the halyard to the edge of the mast, at the gooseneck.
f) Adjust the rake as needed, using the above table, using the stays and triatic also, (should you have a triatic), don't forget that, ok?
g) Once all is where it should be, and the mast is where you want it, I would go with a rake of 1 º Deg for both masts for cruisers and 3% for racers.
h) Later on, once you sail, if you "feel" you need more rake use above numbers and adjust all again.
Note if you have a mizzen, for the triatic, you need a little help to get up there, but try to do it once with only one climb.
3)Dynamic Adjustment.
This will be obviously done later, if you feel you need more bend or better mast flexibility. See note further down, as at this stage we need to talk about tension in the rig.
The next step is therefore set the right shroud tension.
1) Shroud tension
We now need to tension the upper shrouds, so let's tension them.
The values I calculated for our friend in the example are as follows:
a) All shrouds, including the upper, intermediate and lower are to be tensioned to 15% of the cable breaking load which in his case was:
3/16 cable the breaking load is 4850 lbs, so 15% of that is 727,5 Lbs
1/4 cable the breaking load is 7054 lbs, so 15% of that is 1058 Lbs
5/16 cable the breaking load is 12566 lbs, so 15% of that is 1885Lbs
b) The stays and triatic are to be set at 20 to 25% of the breaking load.
Use the same calculations above, to calculate the setting values, if you have a LOOS gauge, use it to set these tensions.
c) Now for the main shrouds, if you don't have a Loos, or are just a cheap person, you can use a measuring tape. I did for many years.
You will need to attach a tape of at least 2 meters to the shroud, so that the zero or the beginning of the tape starts at the turnbuckle.
The rule is simple each 1mm of stretch means 5% of the breaking load, and that is valid for ANY CABLE IN A SHROUD, no matter what the diameter is!!!
So you want to have at least 3mm of "growing" or 0.11 inches stretch when you're at the right tension, for 15% tension…cool huh??
Simple. Repeat the other side. Don't do all 3 mm in one go. Do 1mm on each side and measure and adjust slowly so you don't throw the mast off alignment.
Once the upper shrouds are tensioned, go to the next step.
2) Mast Pre bend
Once the masts are where you want them to be, and before we tension the shrouds, we need to set the masts curvature, or pre-bend.
For this attach the halyard that was in the bucket so it ends at the mast foot.
Now adjust the baby stay and or forestays so that the belly of the mast goes forward. Takes a few tries.
The max bend at rest should not exceed half of the mast diameter.
3) Max Mast bend (back stay and or triatic if you have one)
Tension the back stay on the mizzen first, (if you have one), so that the distance from the vertical halyard to the mast is half of the mast's diameter (IMPORTANT - DO NOT EXCEED)
The mast bend when the back stay is pulled should never ever be more than 2% of the height of the mast from the top to the deck (not cabin). In our friends case with a 42 foot mast, at full back stay pull the mast top should not move back more than 10 inches. OK?
NOW IN THE WATER!! Dynamic Adjustment continuation of chapter 3 above.
OK so where are you going to set the intermediate and lower shrouds??
LOWERS
Easy. At dock, adjust the lowers so they are just tensile to the finger, use the Loos to set them equally port and starbord, they should be almost flexible at rest. Hard but not too much. These can only be adjusted once you sailed to measurel.
INTEMEDIATES
also at dock, Should have a flex of about ½ inch when at rest.
The lower shrouds adjustment
Now, when you go sailing, on the first tack, see if the mast is vertical and doesn't bend sideways when you are on a tack.
Look from underneath and see if it's straight.
If the mast bends to leeward, kind of like bellies to the low side, the lowers are too flexed.
Go to the lee side lower, and turn it a few turns, and note how many times you turned.
Then tack to the other side and see if its good. If its still bent, go on the lee side one and do the same number of turns plus a few more, repeat tacking and adjusting till all is good and straight.
The Intermediate shrouds adjustment
It's the same as with the lowers, except now it's the top part of the mast that "bends" to leeward if they are lose.
Those only adjust at the marina, ok??? You need to go up there.
So a recap:
1) Tighten by hand the upper shrouds till the mast is straight.
2) Adjust mast rake with stays and backstay/triatic.
3) Tension upper shrouds to 15% breaking load
4) Adjust mast pre-bend
5) Adjust back stay movement to not more than 2% mast lenght
6) Adjust lower shrouds while sailing
7) Adjust intermediates observing while sailing and adjusting at dock
Have fun.
Small introductory disclaimer (because you Americans love to sue people):
For the record it is my strong personal opinion and belief that any and all work performed in a boat's rig should be performed and done by appropriate professionals, (that know what they are doing, because I have seen too many "rig professionals" that don't have a clue of what they are doing), do it yourself only if you have at least 3 ounces of brain and if have been around boats long enough and know with a minimal amount what you are doing..If you don't, PLEASE DON'T TOUCH IT, IT's NOT FOR YOU.
If you damage your rigging, your boat and/or hurt yourself or others don't come here blame me..get a life, I wrote this for intelligent people only.
This I write bellow is to help you get by should you not find a rigger near you. IT IS FOR INFORMATION ONLY.
Now the post:
A few months ago, one of our most dear friends here at Sailnet was stranded with a mast down problem, in a location where proper rigging professionals were scarce and the knowledge about rigging of the existing "rig professionals" was par to the local baker, veterinary and dentist…(I think he mentioned they were the same guy)…
So, and since he asked, I wrote him a small letter (sorry for the spelling mistakes and grammar), where I tried to explain to him how to set his rig in a way that would allow him to continue his journey and even get by in the future.
Please note this is my own experience, and other people may have better procedures..like I say, I am not a professional, and do this based on my own experiences. So if you don't like it, write you own and post here. It will only enrich the site. Please keep disagreements to PM level only, and I will discuss with you, should you not like or agree with me. Thank you.
HOW TO ADJUST AND SET YOUR RIGGING:
First you need understand this:
We will do 3 basic adjustment types:
• Lateral Adjustment
• Longitudinal Adjustment
• Sailing (done later) Adjustmet
1) Lateral Adjustment.
(NOTE: this has to be done in a day with no wind with the boat perfectly horizontal, shift weight if you have to, to balance the boat).
a) Install the mast, and make sure the intermediate and lower shrouds are lose, but attached.
b) Make sure the stays and back stays are attached but not over tightened. At this point you want the mast as vertical as possible.
c) Remove the boom, or lower it so its not pulling on the mast, we will need the topping lift.
d) If the mast is keel stepped, remove the centering thru deck bushings at this stage.
e) Once the mast is up and vertical by eye observation, take the topping lift or the main halyard and measure the distance from the top of the mast to the boat's toe rail on port side. Repeat on starboard side, make sure the location of measure is symmetrical and at the same distance from the bow.
f) If the distances are not the same, tighten the side with the longest measurement.
g) Tighten the upper shrouds to a snug fit the same number of turns on each side, until the mast is perfectly centered.
2) Longitudinal Adjustment. (Rake)
(NOTE: this has to be done in a day with no wind with the boat perfectly horizontal, shift weight if you have to balance the boat).
Rake will help increase or decrease Weather helm. Aft Rake increases weather helm, improving pointing, forward rake does the opposite.
Normal rake is 1 to 2º degrees aft for cruiser boats and up to 4º deg aft for high performance racers.
a) Install a bucket with water under the boom by the mast.
b) Attach a heavy object to the main sail halyard and dip it the bucket but it should not touch the bottom of the bucket. (The bucket and water are used to dampen the swinging of the halyard.)
c) Measure P, which is the distance from the boom to the top of the mast.
d) Measure the distance from the halyard to the edge of the mast, at the gooseneck.
The distance should be as follows in the table:
Here is an example:
Our friend's mast is 42 feet long, or 12,8 meters, therefore for:
0,5º Deg rake = 11,52 cm = 4,33 Inches
1º Deg rake = 22,4 cm = 8,66 Inches
2º Deg rake = 44,8 cm = 17,3 Inches
3º Deg rake = 67,2 cm = 26,3 Inches
He also had a mizzen mast, and in his case, the mizzen mast has 21 feet, or 6,4 meters, therefore, for:
0,5º Deg rake = 5,76 cm = 1,96 Inches
1º Deg rake = 11,2 cm = 4,33 Inches
2º Deg rake = 22,4 cm = 8,66 Inches
3º Deg rake = 33,6 cm = 12,99Inches
e) Measure the distance from the halyard to the edge of the mast, at the gooseneck.
f) Adjust the rake as needed, using the above table, using the stays and triatic also, (should you have a triatic), don't forget that, ok?
g) Once all is where it should be, and the mast is where you want it, I would go with a rake of 1 º Deg for both masts for cruisers and 3% for racers.
h) Later on, once you sail, if you "feel" you need more rake use above numbers and adjust all again.
Note if you have a mizzen, for the triatic, you need a little help to get up there, but try to do it once with only one climb.
3)Dynamic Adjustment.
This will be obviously done later, if you feel you need more bend or better mast flexibility. See note further down, as at this stage we need to talk about tension in the rig.
The next step is therefore set the right shroud tension.
RIG TENSION
1) Shroud tension
We now need to tension the upper shrouds, so let's tension them.
The values I calculated for our friend in the example are as follows:
a) All shrouds, including the upper, intermediate and lower are to be tensioned to 15% of the cable breaking load which in his case was:
3/16 cable the breaking load is 4850 lbs, so 15% of that is 727,5 Lbs
1/4 cable the breaking load is 7054 lbs, so 15% of that is 1058 Lbs
5/16 cable the breaking load is 12566 lbs, so 15% of that is 1885Lbs
b) The stays and triatic are to be set at 20 to 25% of the breaking load.
Use the same calculations above, to calculate the setting values, if you have a LOOS gauge, use it to set these tensions.
c) Now for the main shrouds, if you don't have a Loos, or are just a cheap person, you can use a measuring tape. I did for many years.
You will need to attach a tape of at least 2 meters to the shroud, so that the zero or the beginning of the tape starts at the turnbuckle.
The rule is simple each 1mm of stretch means 5% of the breaking load, and that is valid for ANY CABLE IN A SHROUD, no matter what the diameter is!!!
So you want to have at least 3mm of "growing" or 0.11 inches stretch when you're at the right tension, for 15% tension…cool huh??
Simple. Repeat the other side. Don't do all 3 mm in one go. Do 1mm on each side and measure and adjust slowly so you don't throw the mast off alignment.
Once the upper shrouds are tensioned, go to the next step.
2) Mast Pre bend
Once the masts are where you want them to be, and before we tension the shrouds, we need to set the masts curvature, or pre-bend.
For this attach the halyard that was in the bucket so it ends at the mast foot.
Now adjust the baby stay and or forestays so that the belly of the mast goes forward. Takes a few tries.
The max bend at rest should not exceed half of the mast diameter.
3) Max Mast bend (back stay and or triatic if you have one)
Tension the back stay on the mizzen first, (if you have one), so that the distance from the vertical halyard to the mast is half of the mast's diameter (IMPORTANT - DO NOT EXCEED)
The mast bend when the back stay is pulled should never ever be more than 2% of the height of the mast from the top to the deck (not cabin). In our friends case with a 42 foot mast, at full back stay pull the mast top should not move back more than 10 inches. OK?
NOW IN THE WATER!! Dynamic Adjustment continuation of chapter 3 above.
OK so where are you going to set the intermediate and lower shrouds??
LOWERS
Easy. At dock, adjust the lowers so they are just tensile to the finger, use the Loos to set them equally port and starbord, they should be almost flexible at rest. Hard but not too much. These can only be adjusted once you sailed to measurel.
INTEMEDIATES
also at dock, Should have a flex of about ½ inch when at rest.
The lower shrouds adjustment
Now, when you go sailing, on the first tack, see if the mast is vertical and doesn't bend sideways when you are on a tack.
Look from underneath and see if it's straight.
If the mast bends to leeward, kind of like bellies to the low side, the lowers are too flexed.
Go to the lee side lower, and turn it a few turns, and note how many times you turned.
Then tack to the other side and see if its good. If its still bent, go on the lee side one and do the same number of turns plus a few more, repeat tacking and adjusting till all is good and straight.
The Intermediate shrouds adjustment
It's the same as with the lowers, except now it's the top part of the mast that "bends" to leeward if they are lose.
Those only adjust at the marina, ok??? You need to go up there.
So a recap:
1) Tighten by hand the upper shrouds till the mast is straight.
2) Adjust mast rake with stays and backstay/triatic.
3) Tension upper shrouds to 15% breaking load
4) Adjust mast pre-bend
5) Adjust back stay movement to not more than 2% mast lenght
6) Adjust lower shrouds while sailing
7) Adjust intermediates observing while sailing and adjusting at dock
Have fun.