SailNet Community banner
  • SailNet is a forum community dedicated to Sailing enthusiasts. Come join the discussion about sailing, modifications, classifieds, troubleshooting, repairs, reviews, maintenance, and more!

Leak through detent holes after replacing transducer

2 reading
1.8K views 7 replies 5 participants last post by  Zanshin  
#1 ·
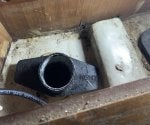
I replaced a Datamarine depth transducer that was secured with a detent pin, with a Raymarine screw down transducer. There’s now a small leak through the detent pin holes (which was revealed when I dropped the boat in the water last spring), I did a quick patch with electric tape, but I’m looking for a more permanent solution. Three ideas: replace the transducer housing, cut off the top of the transducer housing down past the detent holes, fill in the holes with marine adhesive. Replacing the housing seems like quite an ordeal, it’s secure down with some serious adhesive. Cutting the housing horizontally (to excise the decent holes) in the tight space also seems difficult. If I fill in the holes with adhesive, I have to maintain the threads somehow. Any suggestions on the most effective and effortless path? Pics of housing, detent hole and new transducer below
Image
Image
Image
 
#4 ·
be aware that the yellow o ring on the top of that airmar/raymarine transducer is specifically for the newer housings. Not sure what housing you have, but there is a comment in the install instructions that if using the older housing you need to replace the yellow oring with the thinner black oring or leaks will occur.

That being said, those holes look to be below that so I’m not sure if the different oring will solve your problem. That doesnt look like the right housing for that transducer. Just my .02 based on a recent similar project.
 
#6 ·
be aware that the yellow o ring on the top of that airmar/raymarine transducer is specifically for the newer housings. Not sure what housing you have, but there is a comment in the install instructions that if using the older housing you need to replace the yellow oring with the thinner black oring or leaks will occur.

That being said, those holes look to be below that so I’m not sure if the different oring will solve your problem. That doesnt look like the right housing for that transducer. Just my .02 based on a recent similar project.
I had the thin black ring in when the travelift dropped it. They immeditely lifted it back up when they noticed the leak and I had 30m to sort it out, which included the electric tape and adding the yellow ring
 
#5 ·
Honestly the housing is just plastic, using a oscillating type tool or a dremel. A few cuts, some cursing and some application of percussive force, and maybe some heat from a heat gun, the housing should pop out to allow for a new housing to be installed.

You could probably make a plug to seal the hole in the housing Using pva to cover the threads so the epoxy doesn’t stick to the threads or the plug. But if it goes wrong, it’s going to make a lot more work to undo the mess. Would not be my first choice.

Easiest is just keep doing what you’ve been doing. But Go with a better tape than electrical. Clean the housing impeccably. Then apply tape again but to the entire inner surface of the housing. Ie one large piece The tape they use for the plastic heat shrink winter covers is good stuff.
 
#7 ·
From the 1st pic, it seems like the housing is supposed to "screw" down somehow (tight arrow), which seems odd since I thought the housing was just "glued" in. Any ideas other than channel lock handles on how to get leverage on the flange wings so I can try to give it a good twist?
 
#8 · (Edited)
The top of the transducer has an arrow that should point in the direction of forward travel. I once installed it backwards (because I was facing aft when replacing the plug) and it leaked; it seems that there is some thin plastic groove that is supposed to prevent it being inserted 180 degrees off, but it is easy to force in the wrong way. Once I replaced it the correct way around the leak stopped.