SailNet Community banner
  • SailNet is a forum community dedicated to Sailing enthusiasts. Come join the discussion about sailing, modifications, classifieds, troubleshooting, repairs, reviews, maintenance, and more!

Used boat electrical panels

7K views 28 replies 13 participants last post by  6knotsaway  
#1 ·
Anyone who has bought a boat that had several PO's has probably seen an electrical panel with tape and hand written descriptions over the original labeling. If the PO's were crazy/lazy/inept, the panels are often functionally similar to this:

Image
 
#2 ·
I want to see what happens if you open the Gravity breaker

meanwhile I look across to my electric panel and count 8 none original labels. To be fair only 1 of which was an originally installed breaker.
 
#4 ·
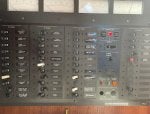
As I'd gotten the Skipping Stone for a great deal less than the asking price, the owner really didn't want to come to the boat and give me any pointers. Apparently he was pretty pissed off. It didn't take much to figure out the 12vdc and 120 vac panels. Afterall, almost every yacht has a similar sort of panel, even those in a foreign language.
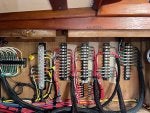
I guess the PO's friends told him he was pretty lucky to have sold the boat at all, being the fall of 2009, in New York. So, about a week after the purchase, he showed up and suddenly I had a full cockpit enclosure and a bunch of other things I hadn't found yet. But most important, by far, was a switch hidden up under the counter near the fwd head sink. Apparently, I would have had to completely rewire the fwd sump system, had he not shown me the switch. Whew.
 
#12 ·
It's been two years of ownership and I have not opened the panel.

I'm afraid to after opening the instrument pod and seeing the world's record rat's nest, discovering that battery connections are mislabeled, the mast wiring is mislabeled, and having to rewire parts of the boat.
I understand your pain. Attached are my before and almost done after pictures. I bet my rats nest would have given yours a run for the money. I removed 4 large kitchen sized garbage bags literally stuffed full of old cables and wiring. And the pain of seeing/fixing the way POs ran wires. I have multiple factory installed conduits running from port to starboard. One conduit was almost empty (so plenty of run to run wires) but POs in past just zip tied wires to the outside of the conduit rather than run the wires through the conduit. All in all the boat was a mess and dangerous with heavy gauge (2/0) wires unfused.

I now have everything organized and labeled with schematics to match the actual wiring. And a panel that the labels match the breaker/function, in a font large enough for old men to read without their readers.:ROFLMAO:(y) Feels good.

Good luck
Foster
 

Attachments

#7 ·
Not bad, I have almost all original riveted on labels except two and one peeling plastic label maker label.
It's everything else that's suspect. 37yo battery cables with bare insulation spots, a brass cable bolted extension, no breaker o_O
 
#11 ·
I just want to ask more questions .............................but am not feeling like getting the warning currently. If it had been at night with an empty wine bottle there could be a lot of entertainment here till you got up in the morning and saw.
 
#20 ·
I think yours is great. Clean and organized. That is what matters. If mine had looked like yours I would have been happy and never started the project. The goal is for when it stops working (and it will), there is a way to troubleshoot the problem and fix it. With my original mess that was literally impossible.

Thanks and Best

Foster
 
#24 ·
Me either. But space was an issue and I couldn't think of a reason why it wouldn't work. I bought some silver coated copper bar stock and made bars the correct length to join it together. Saved money on another class T fuse holder but more importantly saved space. I have since made formed clear covers to protect them.

Foster
 
#28 ·
6knotsaway. I used Panduit Self Laminating Laser/Inkjet Labels run through our laser printer. I created a spreadsheet for each size label to use as a template. Then could fill in and print then as needed. For anything in the engine area or in lockers outside that might be a little more exposed I used clear heatshrink over the label if possible. So far it has worked well.


Best
Foster
 
#29 ·
Hey Foster,
Thanks for your response. Your implementation is really cool. I never thought clear heat-shrink tubes existed. I am going for it! Also, I cannot go without mentioning that I have been analysing your super neat cable work and front panel for months and have just bought most of the materials to copy make it myself. Your panel is by far the best I have seen! Well done. I will post pics when I am done.
Cheers,
Harry