SailNet Community banner
  • SailNet is a forum community dedicated to Sailing enthusiasts. Come join the discussion about sailing, modifications, classifieds, troubleshooting, repairs, reviews, maintenance, and more!

Perkins 4.108M DIY Rebuild -- A Narrative

1 reading
206K views 279 replies 47 participants last post by  mcdaid.andy  
#1 · (Edited)
This Ought to Keep Me Busy...

So, glutton for punishment that I am, I've started a winter project:

Image


That's our aux -- a reliable Perkins 4.108M that (as you can tell from the staining) has developed a bit of an oil leak problem that is even high by Perkins standards. We also were getting a pretty noticeable exhaust stain on the stern, which didn't indicate good things...

After a lot of deliberation about whether or not to repower, I decided to bring this lump home to tear her down and see just how bad is is. I'll do a complete inspection, measuring the components against workshop manual specs, to see what all needs to be replaced.

At this point, I figure that at best I can get by with a top end job. If the cylinders liners show significant wear, then those'll need to be replaced.

The deal breakers will be if the block, crank, head or other major components need to be replaced.

Stay tuned...

What fun!
 
#2 ·
Re: This Ought to Keep Me Busy...

Hey Tom, I know how good you are at this type of stuff and that the rebuilt will be bettrr than new. Good luck my friend. Lake Macatawa just isn't the same since you left (3-4 years ago?), literally. I don't know if you could get into your old slip, we are down to record low water levels.
Have fun with your project.
 
#8 ·
Re: This Ought to Keep Me Busy...

Hey Tom, I know how good you are at this type of stuff and that the rebuilt will be bettrr than new. Good luck my friend. Lake Macatawa just isn't the same since you left (3-4 years ago?), literally. I don't know if you could get into your old slip, we are down to record low water levels.
Have fun with your project.
Tim,

Thanks for the vote of confidence! Hopefully it's warranted ;)

I've seen the dismal water level reports -- I think I'd have been stranded there at Yacht Basin. Hopefully, the levels will improve for you guys. Of course, that'll need a LOT of snow this winter :D
 
#5 ·
Re: This Ought to Keep Me Busy...

Yes, picks please you never know when they could come in handy! That should keep you busy for a while. I rebuilt an MG motor, it never really ran much better afterwards, but hey it was built by Leyland and fired by Lucus, and I figured if I got it started I was ahead of the game! 500 miles was the longest between breakdowns! But I sure learned a lot, and had fun with that little thing!
 
#6 ·
Re: This Ought to Keep Me Busy...

Yes, picks please you never know when they could come in handy! That should keep you busy for a while. I rebuilt an MG motor, it never really ran much better afterwards, but hey it was built by Leyland and fired by Lucus, and I figured if I got it started I was ahead of the game! 500 miles was the longest between breakdowns! But I sure learned a lot, and had fun with that little thing!
Paul -- You're gonna jinx me!!! There's way too many similarities :D

- The last engine I tore down and reassembled was from my Triumph GT6;
- The Perky is also of British heritage;

I'll be happy if I solve the (major) leak issues...
 
#7 ·
Re: This Ought to Keep Me Busy...

Chapter 1: Getting the Beast Home

Not too many pics here, so please accept the descriptions and let your mind's eye paint the picture.

The first thing I did was to strip the engine of all the major external components. Since I'd pulled the transmission late last spring, the engine was pretty much bob-tailed anyway. I left the bellhousing on since the rear engine mounts are bolted to it (more on this design feature later in the story...) I pulled the heat exhanger/exhaust manifold, starter, raw water pump, alternator, and oil sump drain pump. I labeled each wire as it came off of the block.

I loosened the top nuts on the motor mounts; this wasn't as easy as it sounds. Besides the expected rust issues, the rear portside is masked by the bump-out in the bellhousing for the starter. I ran a chain fall down from a pair of 2x4's across the companionway opening and put some tension on the motor to stabilize it and unbolted the motor mount bracket from the bell housing. Once that was free, lifted the engine a couple of inches just so I could get a wrench on the motor mount nut. Anyway, long story short -- got all the motor mounts loose.

The next focus was prepping for transport and offload back here at home. I taped over all of the openings from the parts I'd already pulled. Here in the garage, I constructed the cradle in the shot above from 2x3, 2x4 and 4x4's. I also built a knock-down cross-beam that would be large enough to get a trailer under. I used 4x4's for the uprights and the crossbeam; everything else is 2x4's. Here's a look at that set up.

Image


After that it was just a simple matter of getting the crane scheduled, renting a U-Haul motorcycle trailer, and getting it done.

After I dropped the dodger, frame and boom gallows, I took an extra hour to protect the companionway.

Image


The crane showed up on time (0900), and the crane operator and I did a quick walk through. Since it was just him, I had to be up in the cockpit. Being somewhat cautious, I decided to suspend the chainfall from the crane hook so I could take it real slow if need be. I used the chainfall for the first six inches or so, then gave hand signals to the crane operator. All in all she came out real easy. By 0930, I was bolting her down in the cradle on the trailer.

After an uneventful trip home, I got her off the trailer. At that point I had to start disassembly in order to get it ready to pop on the engine stand. I had to pull the bell housing, damper plate, flywheel and rear end plate. At that point, the engine stand yoke will (just) line up with bolt holes in the block. There's also (barely) enough room to remove the rear main seal housing.

The only mishap was that one of the damper plate bolts snapped off below the surface of the flywheel. That's gonna be a treat to fix...

Next chapter: The Tear Down
 
#9 ·
Re: This Ought to Keep Me Busy...

Glutton for punishment? Maybe, but I have a feeling that you are going to do what it takes, no matter what. Besides, you've got all winter to work on it. We'll all be watching and enjoying your reports.

Those of you who love(d) and owned British sports cars should enjoy this: Lucas - Prince of Darkness - Lucas Electrical Humor Jokes
Apologies if you have seen it before.
 
#278 ·
Those of you who love(d) and owned British sports cars should enjoy this: Lucas - Prince of Darkness - Lucas Electrical Humor Jokes
Apologies if you have seen it before.
I once had an International Metro panel van that was powered by an Austin-Healey engine. There was only one parts store in St.Louis that carried parts for English made engines. After I replaced the voltage regulator, the coil and the alternator I became pretty familiar with that shop. One day when I was in the parts shop they had a stack of bumper stickers on the counter that said, "The British drink their beer warm because their refrigerators are made by Lucas Electric."
 
#15 ·
Re: This Ought to Keep Me Busy...

So, glutton for punishment that I am, I've started a winter project:

Image


That's our aux -- a reliable Perkins 4.108M that (as you can tell from the staining) has developed a bit of an oil leak problem that is even high by Perkins standards. We also were getting a pretty noticeable exhaust stain on the stern, which didn't indicate good things...

After a lot of deliberation about whether or not to repower, I decided to bring this lump home to tear her down and see just how bad is is. I'll do a complete inspection, measuring the components against workshop manual specs, to see what all needs to be replaced.

At this point, I figure that at best I can get by with a top end job. If the cylinders liners show significant wear, then those'll need to be replaced.

The deal breakers will be if the block, crank, head or other major components need to be replaced.

Stay tuned...

What fun!
Your problem is the color. REAL diesel engines are supposed to be grey. Paint it grey and it will start running again.

HEHE!

Sounds like a fun project. Can't wait to see it.

Brian
 
#18 ·
Re: This Ought to Keep Me Busy...

Perkins 4.108M: The Teardown

Disclaimer: Not too many pics here -- greasy, grimy hands and digital cameras are a bad combo.

I took my time disassembling the engine, giving all of the parts a first-pass cleaning as they came off to get the majority of the grime off. I kind of used a wide variety of cleaners, together with brass, stainless and regular tooth brushes. Spray Nine did a god job on light dirt. Purple Power was a little better, but plain old mineral spirits was probably the most effective and gives the best bang for the buck. For cleaning non-threaded fastener openings, I bought a cheap gun cleaning set from Wal-Mart; the bore brushes included work well for holes up to 3/8". For the larger holes I laid on a set of pipe cleaning brushes from the plumbing section of Lowes. For the nooks and crannies I broke out the dental tools.

I hit all threaded openings (and fasteners that were still in good shape) with thread chasers.

Image


Image


Each assembly went into its own ziplock bag, complete with fasteners. Those assemblies that were too big for bags were wrapped in packing stretch film. I gave all the iron parts a quick wipe down with ATF or WD-40 first to keep rust at bay until the engine goes back together.

Image


Getting the cylinder head off was a bit of a struggle. I had to use some wooden door shims between the block and the head to get them to come apart. Once the head was off, I saw why. Several of the studs had developed a decent layer of rust, which kind of jammed things up.

Image


Image


All in all, I only had to hit a half-dozen or so fasteners with heat to get them out. The cheapo propane torch definitely came in handy. A couple put up real fights, but they eventually came loose. Repeated applications of PB Blaster, heat, and perseverance eventually won the day.

Several of the head studs are getting a little pitted...

Image


Some of the fasteners are just not worth saving. Here's what most of the bell housing studs looked like. It'll be much better/easier to just replace them.

Image


Getting gasket residue off is time consuming. For small parts that came off the block, I chucked a brass brush into the drill press and let the machine do the hard work. For the bigger parts, it was a combination of tools: a putty knife I put a chisel point on; utility knife blades; safety razor blades; and an old putty knife blade I had sharpened like a card scraper.

Clean mating surfaces:

Image


The broken damper plate bolt eventually came out. Initially I drilled a hole for the easy out only deep enough to get the threads to bite, then let it soak with PBB. No joy... Heat, then more PBB and soak a couple of days; still no joy. Eventually I drilled completely through the length of the bolt so that the torch flame would get heat to the whole part -- JOY!

Image


Next Chapter: Measurements
 
#23 ·
Re: This Ought to Keep Me Busy...

Teardown -- The Rest of the Story

OK, so I noticed that I neglected to include the cylinder head in my previous post.

Just to recap, the reason I began this project was to figure out (and hopefully fix) my excessive oil consumption.

After pulling the intake manifold I could see that a lot of the oil was coming out of the top of the engine, through the crankcase breather, and into the intake. The inside of the intake manifold was caked with oil, and you can see the oil accumulation on the face if the intake valves. Not promising...

Image


Image


One of the features of the 4.108 is that the valves have both inner and outer valve springs. That meant that my trusty valve spring compressor just wasn't gonna work. I needed to get a lever arm type, but sticker shock pointed me in another direction. I picked up an 8" c-clamp and a conduit coupler at the closest big box store, and made my own. Total cost -- about $15, plus I've now got a big honkin' c-clamp (one can never have too many clamps, donchaknow.

Image


Image


Anyway, the valves will need to be replaced. The tips (that contact the rocker arms) are pretty well worn. Since the rocker arms have dished out the tops of the tips, getting an accurate valve adjustment is pretty much impossible with a standard feeler gauge. Could I clean them up and reuse them? Sure, but replacements are relatively inexpensive.

Image


The intake valve seats look pretty good -- must have been all that oil keeping them happy.

The exhaust seats are a little pitted, but nothing that lapping won't fix.

The passages were pretty gunked up; the intakes with congealed dirt/oil and the exhaust with carbon build up. Again, solvents, brushes and dental tools were put to use. I got it fairly clean, but I think I'm gonna have the head hot-tanked anyway so further scrubbing would be a waste of time.

BEFORE:
Image


AFTER:
Image


Next Edition: The Measurements (for real this time...)
 
#30 ·
Re: This Ought to Keep Me Busy...

OK, looks like we're going on the installment plan...

___________________________________________

Today's Chapter: The Measurements

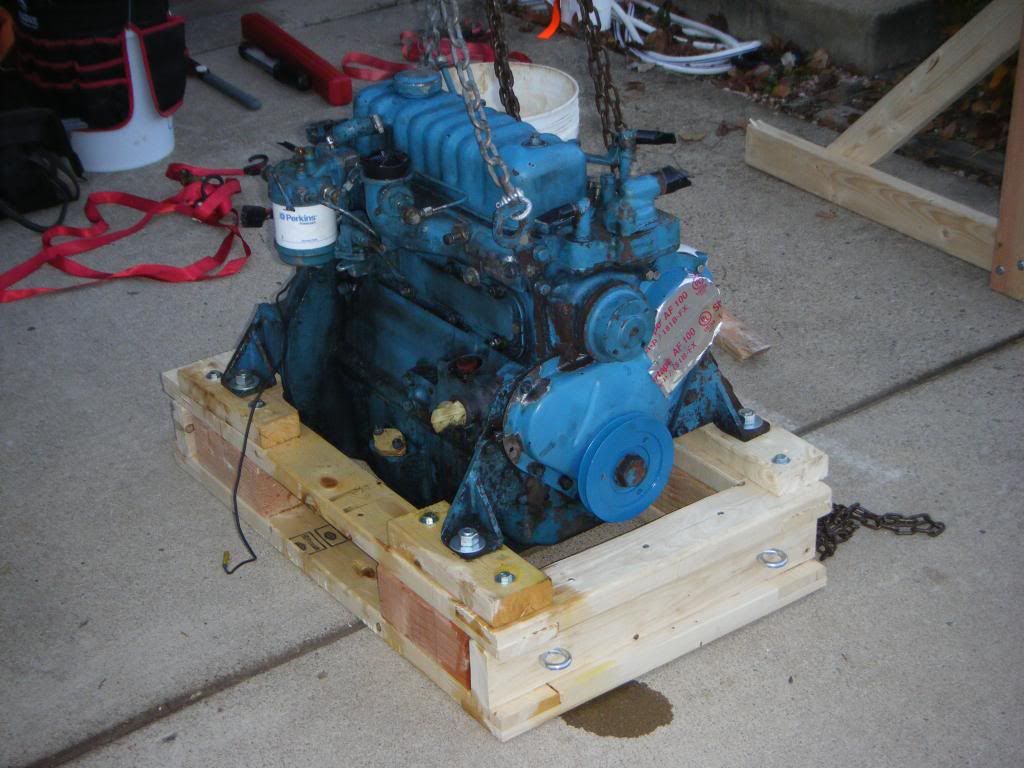
So now that the engine is reduced to its many component parts, the task is to measure things to see how much wear we've got to deal with.

Starting with the data from the service manual, it's simply a matter of checking to see whether or not the parts are within acceptable ranges.

I decided to make my own series of worksheets to record the results, cutting and pasting diagrams and spec data from the service manual into an Excel worksheet. One of the quirks with the Perkins service manual is that relevant data for a particular part of the engine is located in different parts of the book; there's the nominal tech data tables, the acceptable wear limits table, the "how to" paragraphs/diagrams on what to do, etc, etc. It got a little frustrating getting referred to another part of the book (as in "...clearance should be within the range listed in table B.2"), necessitating going back to the front of the book. Better yet, it's a little more organized that a loose leafed binder and I wouldn't be tempted to make notes in the margin of the manual.

Here's an example (this one's for the crankshaft):

Image


Two main areas needed particular attention:

o Since I was getting oil through the top end, I had to try and find out why.
o Ordering the proper sized bearings is critical -- if any previous owner had the crankshaft reground, then undersized bearings would be needed for both the main bearings and the big end bearings.

I started by making sure that the edge of my steel ruler was in fact dead flat; taking measurements where we're talking about accuracy in the 1/1,000" range it's worth the extra effort. I've got a big piece of float glass that I use with silicon carbide sandpaper to sharpen my wood chisels and plane irons -- I just flipped it over and did the same kind of thing for the steel ruler from a combination square.

Image


My initial fear was that the cylinder head was warped. On many engines, any excessive warp can be fixed by having the head milled back flat (or "skimmed" in British parlance) -- for the Perkins, that's not supposed to be done. There is a margin of allowable error, 0.003" side to side and 0.006" front to rear.

I measured lengthwise, widthwise, diagonals, pretty much every way you could think of -- it's not dead flat, but there are no gaps anywhere larger than 0.002". Good news.

Image


While I had the head on the bench, I double checked the other nominal data like for the combustion chamber inserts and their recesses. I intend to replace the valve guides anyway, so I ignored them.

The next piece on the table was the crankshaft. Same game, same results. No scoring or scratches, and the bearings show normal wear. The journals are all within a thou or two of nominal, so the shaft hasn't been machined, and standard sized bearings are what I'll need to order. I'll have the shaft polished just before I start reassembling the engine.

Image


Image


So far, the likely culprit for the leak remains undetected.

The cylinder block's up next.

Several things to check: cylinder bore liner insert wear, camshaft clearance and tappet lift, and liner clearance above the block deck.

Before I started checking bore wear, I spun a hone in each cylinder to highlight any major wear areas.

Image


As you can see, as was expected the top two compression rings have carved out a couple of spots at the top of each cylinder. This is normal.

Image


Using a bore gauge, I measured wear at multiple points in each cylinder.

Image


Long story short, the nominal bore for each cylinder is 3.125"-3.126"; and acceptable wear is 0.006". With the exception of compression ring grooves, wear was well within the acceptable range (about 0.001" front to back; about 0.002" side to side.) The grooves, on the other hand, are a different story. Although they too fall within the acceptable range, they're only about 0.0015" from hitting the limit. Since I'd have to hone the bores down to the lowest (or widest) diameter, that would mean that the entire bore would be a little over a thou from being due for replacement. This is a no-brainer -- the engine's apart, so it just makes sense to replace the liners.

Measuring cam lift is a simple matter of setting up and using a dial indicator. I also double checked the measurements of the bearing journals of the shaft itself. As with the crankshaft, almost no wear was found.

Image


The 4.108 uses dry fit cylinder liners (the 4.99 and 4.107 use wet liners). The inserts are supposed to protrude above the deck of the block to get a good steel-to-steel interface with the cylinder head while leaving room for the head gasket. The nominal protrusion range is 0.023" - 0.027". What I found was that the liner protrusion wasn't equal for each cylinder. #1 was 0.026", #2 was 0.029, #3 was 0.027" and #4 was 0.031". I think we may have identified a potential suspect...

Image


And that, my friends, means that I'll be buying a "major overhaul kit" instead of just a "top end overhaul kit." The top end kit comes with valves, guides, and the rest of the stuff to just do the valve train; the major overhaul kit tacks on pistons and rings, liners, wrist pins, connecting rod bearings, and top and bottom gasket kits.

Next Up: The Water Pump
 
#31 · (Edited by Moderator)
A little more background on this engine.

Based on the engine serial number, this engine began its life in 1987. Our Vagabond 39 is an '85, so chances are better than good that this was a replacement engine installed at some point. Since its also got a couple of layers of blue paint, I'm also guessing that it's been rebuilt at some point along the way as well.

We've run this engine a fair amount since we bought the boat in 2008. We completed America's Great Loop, with many, many hours of engine only propulsion.

Because of a persistent oil consumption issue, as well as suffering from typical Perkins leakiness, I decided to pull it out of the boat and give it a look see. Based on my observations during tear-down, I consider it absolutely worth keeping.

So, now the story can proceed... Comments, suggestions, and humorous additions are more than welcome ;)

_____________________

Chapter 4: The Water Pump (a Postmortem Report.)

Well, I knew that my good luck was destined to run out at some point...

I had a suspicion that my water pump was overdue for attention, and since I'm taking everything else apart I decided to tear it down as well.

As you can see, it was a dirty mess. That said (and even though the rust/corrosion on the case was humming a different song at me) I didn't think that it was failing. I've never noticed any drainage from the weep hole, never seen any coolant in the bilge, and I've never had to add lots of coolant in the header tank since it's always remained at a trusty, visible level.

Image


Image


The disassembly began with removal of the pulley, which is a hell of a lot easier said than done. These puppies are pressed onto the shaft, and without a spline or key they rely solely on friction. As you might guess, the force required to get the pulley on is substantial -- here's what the manual says concerning replacement:

Image


You may also surmise (and you'd be right) that removing it ain't easy either.

After I chased out the threaded holes in the pulley, I set up a harmonic puller:

Image


Image


I worked my way up though the applied force arsenal: combo wrench, combo wrench with a cheater bar, big honking adjustable wrench, Milwaukee impact driver -- no joy whatsoever. I was getting concerned...

I then broke out the heaviest gun I've got:

Image


SUCCESS!

Drove out the bearings...

Image


After a mineral spirits bath...

Image


Image


Then things started to take an ugly turn.

Image


Image


Image


Image


The seals are shot, and were probably already leaking. The shaft also looks overdue for replacement. After consulting the service manual, I also am pretty sure that there's supposed to be another seal assembly between the bearings and the impeller cavity -- missing parts are usually not a good thing.

The Perkins parts manual lists a repair kit that includes the seals, shaft, and impeller, but that part number yields no returns in web searches. Parts number searches for the seals themselves also came up empty. Transatlantic Diesels advised to just go with a replacement pump, since they can't get the repair kits either.

I cleaned and prepped the pulley for paint -- if I do have to buy a new pump, I'll still have to use the original pulley.

Image


Next Up: ROAD TRIP!
 
#32 ·
Cool!

I needed a new shaft for a Jabsco water pump a couple years ago. I took the old one into a machine shop and had them turn out two for me. A replacement and a spare. I got two shafts for less than a new one from Jabsco. I wonder if you could have a new shaft machined? Also, if you take your parts to a bearing store, they can take measurements and provide you with both bearings and seals based on the dimensions. A person can often get seals and bearings for a fraction of the cost this way, but it takes some patience.

For cleaning up parts for painting, a little sandblaster makes quick work of it. I bought the sandblaster nozzle for $25 then bought a plastic foot locker, but a window hole in the top and screwed in a piece of plexiglass for a viewing port. I cut two holes to stick my arms through and cemented in some PVC couplings so I had something to hose clamp a couple of big rubber gloves to on the inside. For about $50 total, I have a portable sandblaster that I either set up on saw horses or on the bed or the pickup.